Sharing content externally is easier than ever. Thanks to the cloud, you can do all kinds of things with data that would otherwise be impossible. The shift from a technology-driven to an intent-driven approach with Microsoft’s suite of offerings means end users are able to collaborate with the right people anywhere they are.
Even with all the fancy technological advancements, external sharing remains a business risk. Any time something gets shared outside of your team, a door is opened for intruders. In a survey conducted by ShareGate, State of Microsoft 365: Migration, Modernization, and Security in 2021, only around 64% of IT teams manage or otherwise control the way each team works with people outside the company.
That’s 36% of businesses that are effectively leaving the back door to their data wide open. So you may be asking, does your team have a handle on how data is being shared? Honestly, if you aren’t sure, they probably don’t.
And that’s okay! Consider us your Rescue Rangers, offering these five tips for you to stay ahead of the who, what, where, and when of external sharing. This blog will cover what external sharing is along with a few basic terms and ideas around file sharing, including these 5 tips to follow when sharing content externally on Office 365:
- TURN ON External Sharing
- TURN OFF Anonymous Sharing
- Educate Your Users On Safe Sharing
- Check Every Permission – TWICE (and then once more)
- Constantly Watch for Suspicious Activity
What is External Sharing?
Microsoft SharePoint offers a feature called external sharing that allows users to share internal content with customers, partners, vendors, clients, and more outside the organization. You can also leverage external sharing capabilities to share information between licensed users on multiple Microsoft 365 subscriptions if your organization has more than one subscription.
To put it into general terms, external sharing takes place when users send data from within your organization to a user outside the organization. This typically looks like an invitation sent to the person via email which contains a link to the shared item within your system. From there, when your users share these internal documents or sites, recipients are prompted to log in with a Microsoft account or a relevant school or Azure AD account.
Depending on your settings, users may be asked to enter a password when they access the document. For example, if Azure AD B2B integration is not enabled, recipients will enter a code each time they access the file or folder, but if the same integration is enabled, recipients may be prompted to sign in or use a one-time passcode.
Confused? How about this…
It’s like asking for a secret password in your tree fort so friends of friends who are mean can’t come hang out. Except the mean friends are trying to extort you for potentially hundreds of thousands of dollars or worse. Y’know?
Five Tips for Sharing Content Externally on Office 365
As with application technology – and pretty much anything that we recommend ever – there are a few options and we strongly believe that you consult with your IT team and external IT provider to come up with the best option for your business. But no matter how your team is going to apply specific security settings for your team, these five tips can be applied across nearly every business, regardless of size or sharing necessities.
1. TURN ON External Sharing
Yep, we said it. Turning on external sharing isn’t a bad thing! Your team could need to collaborate on a document once a day or ten times an hour, and this technology is literally tailor-made for that kind of use. So rather than turning off external sharing altogether, configure external sharing to your specific business needs, while keeping in mind that your users will need to collaborate with external guests. If you are working with an MSP or an external IT Support team, they will be able to walk you through what will work best to protect your business.External sharing is automatically turned on for your entire SharePoint environment and its contained sites. Discuss things with your team, but may want to turn the feature off before people start using sites, or until you know exactly how you want to utilize external sharing. But in the end, turning external sharing on is for the best.
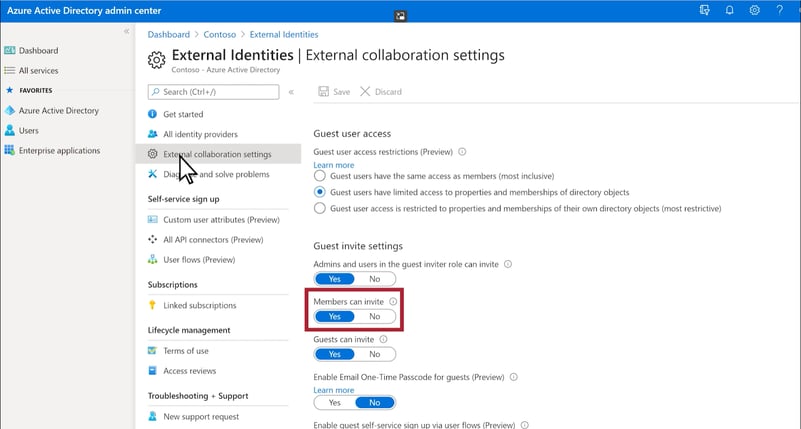
To set external collaboration settings
- Log in to Azure Active Directory at https://aad.portal.azure.com.
- In the left navigation pane, click Azure Active Directory.
- Click External identities.
- On the Get started screen, in the left navigation pane, click External collaboration settings.
- Ensure that either Member users and users assigned to specific admin roles can invite guest users including guests with member permissions or Anyone in the organization can invite guest users including guests and non-admins is selected.
- If you made changes, click Save.

Setting Up External Sharing Policies: Customizing for Different Teams and Departments
Turning on external sharing is essential, but it’s equally important to customize sharing policies based on each team or department's needs. For example, sales teams may frequently collaborate with external clients, while finance may only share files with trusted vendors.
- Tailor Policies by Department: Work with department heads to understand their unique sharing needs. Enable more flexible settings for teams that require regular collaboration with external users, and restrict access for departments handling sensitive information.
- Control Access with Group-Based Permissions: Use group-based permissions in Microsoft 365 to simplify access management. This approach allows you to control external sharing permissions by group, making it easier to update or revoke access as roles change.
- Implement Role-Based Access Controls (RBAC): By assigning permissions based on roles, you limit the amount of data accessible to external collaborators. For example, contractors may only need view-only access to specific project folders rather than full editing rights.
These custom sharing policies help create a safer sharing environment by aligning access controls with each department’s collaboration needs.
2. TURN OFF Anonymous Sharing
In the tech world, the worst kind of user is an anonymous one. Actually, in pretty much every industry… Who wants an anonymous chef? An anonymous cab driver? Anyway, with anonymous sharing, anyone with access to the shared link can view and edit the relevant files, not to mention possessing the ability to forward the link anywhere they want. That’s all bad.
Be wary of anonymous sharing within your organization and keep this feature turned off. This is a great way to keep sensitive information from being shared with users outside your organization who should keep their eyes off your stuff. It’s best to only allow authenticated external users access to your data. You’ll be able to control and follow up with who has access to what.
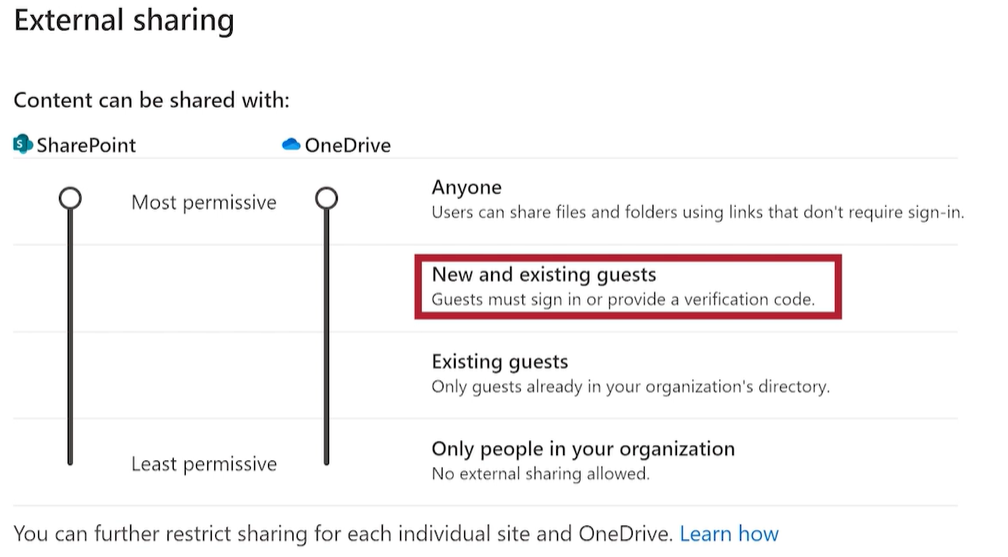
To set external collaboration settings
- Go to Sharing in the SharePoint admin center, and sign in with an account that has admin permissions for your organization.
- Under External sharing, specify your sharing level for SharePoint and OneDrive to New and existing guests. The default level for both is "Anyone."
Using Sensitivity Labels for Added Security
Microsoft 365’s Sensitivity Labels provide an additional layer of security, helping to protect data by classifying documents based on their sensitivity level. Sensitivity labels apply encryption, control permissions, and monitor data access, all while keeping critical data secure.
- Classify Documents by Sensitivity: Sensitivity labels allow you to classify documents as "Confidential," "Internal," or "Public." Based on this classification, you can apply restrictions on who can view or edit the document externally.
- Apply Encryption Automatically: For highly sensitive documents, Sensitivity Labels can enforce encryption that follows the file even if it’s shared outside your organization. This ensures that only authorized users can access the document, reducing the risk of unauthorized sharing.
- Control External Access: Sensitivity labels make it easy to limit document access to authorized users. For example, labels can restrict forwarding or prevent external users from downloading or printing documents, providing an extra level of control.
Using Sensitivity Labels alongside external sharing settings adds a robust layer of protection, ensuring that sensitive data doesn’t fall into the wrong hands.
Implementing Multi-Factor Authentication (MFA) for External Users
Multi-Factor Authentication (MFA) is a powerful security feature that requires external users to verify their identity in multiple ways, reducing the risk of unauthorized access.
- Require MFA for All External Users: Enforce MFA for all external collaborators to add an extra layer of security when they access your shared documents. This prevents unauthorized users from accessing files, even if they somehow obtain login credentials.
- Use Conditional Access Policies: Set conditional access policies to enforce MFA for external users only when they access sensitive files or from untrusted devices. This targeted approach makes MFA less disruptive while still enhancing security.
- Educate External Users on MFA: Provide a brief tutorial or guide for external collaborators on how to complete the MFA process. This reduces any friction and ensures a smooth experience for verified users.
Using MFA for external access ensures that only verified users can interact with your files, adding a critical safeguard against unauthorized access.
3. Educate Your Users On Safe Sharing
When it comes to training, there is never an end. As frustrating as that may sound, there is hardly an industry that isn’t constantly evolving, and technology is at the top of every list regardless of how you use it.Not only should your team be forever-learners about their chosen professions, but team members should be constantly educated on critical – and specific – topics like proper external sharing practices. Consider teaching things like how to share a document instead of sharing an entire site to avoid your team from inadvertently giving access to sensitive data.
Read more: Why You Need to Implement Cyber Security Training Today
Using Expiration Dates for External Access
Expiration dates allow you to grant temporary access to external collaborators, automatically revoking permissions after a set period. This feature is especially useful for time-sensitive projects where external access is only needed temporarily.
- Set Expiration Dates on Shared Links: When sharing a document, set an expiration date for the link to automatically disable access after the project ends.
- Temporary Access for Contractors and Freelancers: For contractors or freelancers working on short-term projects, use expiration dates to prevent prolonged access once their role concludes. This ensures that no external collaborators retain access after they’ve completed their work.
- Regularly Review Expiring Permissions: Office 365 allows administrators to review and adjust expiration dates on shared links. Make sure to review expiring links to confirm that permissions align with project timelines.
Setting expiration dates is a simple but effective way to enhance security, ensuring that only necessary users have access to your files for the duration needed.
4. Check Every Permission – TWICE (and then once more)
Global admins and site owners within Sharepoint are going to share sites with users outside your organization. And no matter what they’re sharing, the link can potentially be intercepted or forwarded incorrectly and fall into the hands of someone who is up to no good.
While you can’t stand in front of every potential threat to your digital defenses, simply checking permissions before any sharing goes down is a crucial step every business can take to protect data. Someone on your team should be tasked with double-checking the permission levels of your users to ensure external users don’t inherit permissions that allow them to wreak havoc in your environment.
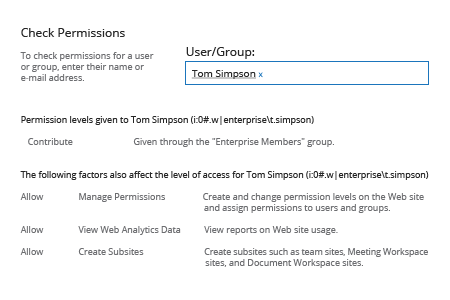
To check users permissions
- Open your SharePoint site settings then click Site Permissions
- Choose Check Permissions then Enter the username of the user whose permissions you want to check
- Click Check Now
- Review the results:

Source: Netwrix
Conducting Regular Audits of Shared Content
Conducting regular audits of shared content ensures that permissions remain up-to-date and helps identify any potential security risks. An audit can also reveal outdated links and files that no longer need to be shared externally.
- Review Active Links: Regularly review all active sharing links to confirm that only necessary content is being shared. Identify and disable links for documents or folders that no longer require external access.
- Identify Expired or Redundant Permissions: Sometimes, users forget to remove external collaborators from projects once they’re completed. Set a schedule (e.g., quarterly or biannually) to review and remove unnecessary permissions for added security.
- Create an Audit Checklist: Develop a simple checklist that includes permissions, expiration dates, and sensitivity labels. This makes it easier to review permissions consistently and track changes over time.
These audits help keep external sharing secure by removing outdated access and ensuring that permissions align with your organization’s current needs.
Leveraging Microsoft 365 Compliance Center for External Sharing Security
Microsoft’s Compliance Center provides a centralized platform to manage and monitor compliance and security for all shared content, helping ensure external sharing meets your organization’s security standards.
- Data Loss Prevention (DLP) Policies: Set up DLP policies in the Compliance Center to automatically monitor and protect sensitive information shared externally. DLP policies can prevent users from sharing files containing confidential information like credit card numbers or personal data.
- Activity Alerts and Compliance Reports: Use the Compliance Center’s activity alerts and compliance reports to track external sharing and ensure all content aligns with internal policies. This visibility allows administrators to identify potential risks before they become issues.
- Retention Policies for Shared Files: Implement retention policies to automatically manage how long files remain accessible to external users. For example, you can set policies that delete files after a certain period or move them to secure storage.
By leveraging the Microsoft 365 Compliance Center, you add an advanced layer of oversight to your external sharing practices, enhancing security and ensuring compliance.
5. Constantly Watch for Suspicious Activity
If you have an IT support team you likely already have a team of professionals constantly watching out for suspicious activity. But short of that, someone on your team should always be scanning for connections that seem unusual or harmful in any way, particularly those masquerading as anonymous when you have that feature turned off.
Automating External Sharing Notifications
Automated notifications can help administrators and users stay informed about external sharing activity, reducing the risk of unauthorized access.
- Set Up Admin Alerts: Configure automated alerts to notify administrators whenever sensitive files are shared externally. This enables a quick response to unexpected or potentially risky sharing actions.
- Enable User Notifications: Office 365 allows users to receive notifications when their shared documents are accessed. This helps them keep track of who is viewing their files, especially when shared outside the organization.
- Monthly Sharing Reports: Schedule monthly reports summarizing external sharing activities across your organization. These reports provide insights into the most frequently shared files, departments engaging in external sharing, and any unusual access patterns.
Automated notifications and reporting help your team maintain visibility over external sharing, allowing you to catch any suspicious activity quickly.
The Importance of Monitoring Shared Content Lifecycles
Effective external sharing doesn’t end when a file is shared. Monitoring the lifecycle of shared content ensures that documents remain secure and relevant throughout their existence.
- Monitor File Access Over Time: Track who is accessing shared files over time to identify any unusual access patterns. For example, if a file hasn’t been accessed in months, consider revoking external access.
- Archive Inactive Content: Files that are no longer relevant to current projects should be archived or removed from shared locations. This reduces the amount of data exposed externally and keeps your file structure organized.
- Set a Review Cycle for Shared Files: Establish a regular review cycle for shared files to confirm they’re still relevant and secure. Every quarter, review active shared links to ensure they’re still needed and access permissions are appropriate.
Monitoring the lifecycle of shared content helps prevent unauthorized access and keeps external collaboration streamlined and secure.
Conclusion
The reality of business today is we share documents. From marketing documents to spreadsheets and well, well beyond, there are all kinds of reasons we need to connect through a feature like SharePoint and 365. But to do so safely is crucial, particularly when there is so much at stake with every transaction. Following these five tips may just save your team from the hassle and heartbreak of improper sharing of your content.
For more information on important security topics like content sharing, give us a call at (864) 552-1291 and we'll help you evaluate capabilities and options. Also, sign up for PTG Tech Talk for bi-monthly tech news and consider following us on LinkedIn, Facebook, and Twitter!


